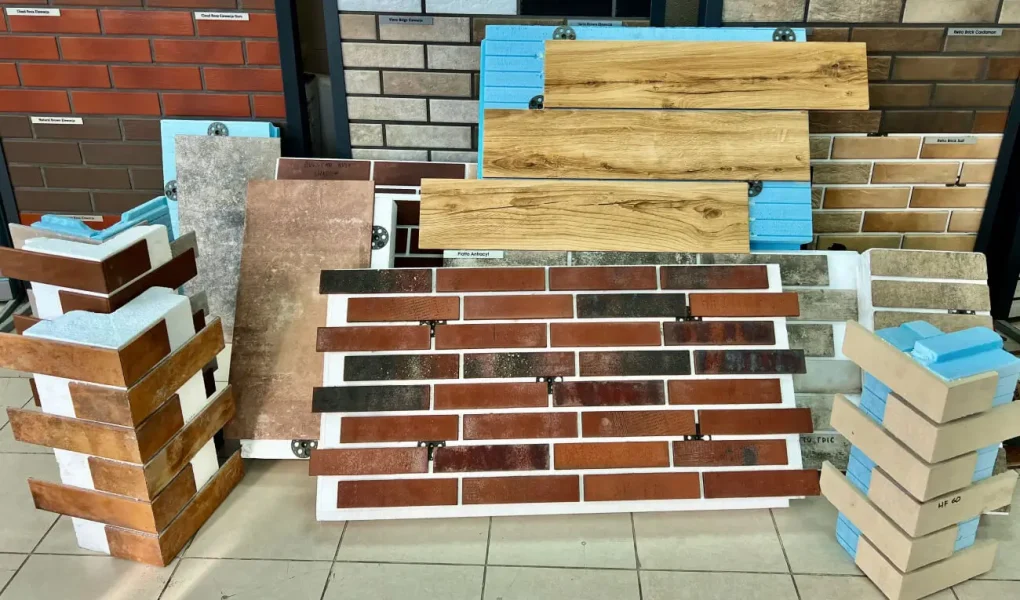
Cladding isn’t just about making a building look good — it’s about protection, insulation, and long-term durability. Whether you’re upgrading a tired exterior or starting from scratch on a new build, the right cladding can transform your home’s appearance while shielding it from the elements. From traditional timber to modern composite materials, today’s options are more varied, weather-resistant, and low-maintenance than ever.
In this guide, we’ll break down everything you need to know about cladding — from choosing the right materials to understanding installation techniques for both vertical and horizontal applications. Whether you’re tackling the job yourself or hiring professionals, you’ll find practical advice that works for homes on both sides of the Atlantic.
Understanding Cladding Types
Composite Cladding
Composite cladding is one of the most popular modern choices for homeowners in both the US and UK. It’s typically made from a blend of recycled wood fibres and plastic, resulting in boards that are strong, weatherproof, and resistant to fading. This mix makes them ideal for areas with fluctuating weather — from damp UK winters to humid US summers.
Composite cladding boards are available in a variety of profiles, including smooth planks, embossed wood grain finishes, and even shiplap designs that overlap to improve water run-off. Vertical composite cladding is a growing trend, giving buildings a sleek, contemporary look while helping with drainage. Brands like EnviroBuild in the UK and Trex in the US offer a wide range of colours and finishes to suit modern and traditional homes alike.
For homeowners looking for a sustainable option, composite boards are a great pick — not only are they long-lasting, but they also often incorporate recycled materials. With minimal upkeep required beyond the occasional clean, they’re a practical choice for busy households.
Timber & Shiplap Styles
Timber cladding remains a timeless favourite, especially for homeowners who want a natural, warm look that blends seamlessly with the surrounding environment. In the UK, vertical timber cladding is often chosen for countryside homes and barn conversions, while in the US, it’s common in coastal and cabin-style builds. The key to a long-lasting timber installation lies in proper fixing details — including correct batten spacing, treated timber for battens, and weatherproof screws. This ensures good ventilation behind the boards and prevents rot over time.
For those who like the clean, structured look, shiplap cladding is a strong contender. Composite shiplap cladding combines the visual appeal of overlapping timber boards with the low maintenance of composite materials. The overlapping edges help direct rainwater away from the wall, making it particularly suitable for wetter climates.
A regional variation worth noting is Yorkshire boarding cladding, which uses spaced vertical boards to allow ventilation while still offering protection. It’s a traditional agricultural style that’s seeing a revival in rural homes and modern barn-style properties. Whether you choose classic timber or a composite version for less upkeep, shiplap and Yorkshire boarding both bring character and texture to a home’s exterior.
Plastic & PVC Cladding
Plastic composite cladding, often made from PVC or uPVC, is a go-to option for homeowners who want a fully low-maintenance exterior. Unlike timber, it won’t rot, warp, or require repainting, and it’s resistant to moisture and pests. In the UK, uPVC cladding is a common sight on coastal properties where salty sea air can quickly wear down wood, while in the US it’s frequently used in humid or rainy regions for similar reasons.
Available in smooth or textured finishes, plastic cladding can mimic the appearance of painted wood without the upkeep. It’s also lightweight, which makes it easier and quicker to install — a benefit for DIYers. Modern designs now come in vertical and horizontal profiles, giving more design flexibility than older, plain panels.
While it’s incredibly durable, one thing to keep in mind is that darker colours may absorb more heat, which can lead to minor expansion in very hot climates. This isn’t a problem if installed correctly with the right fixings and expansion gaps. For homeowners prioritising longevity and minimal upkeep, plastic composite cladding remains one of the most practical choices on the market.
Board and Batten Cladding
Board and batten cladding is a design classic that works just as well on modern builds as it does on traditional farmhouses. The method uses wide boards fixed vertically, with narrower battens covering the gaps between them. This creates strong visual lines and adds depth to a home’s exterior.
In the UK, it’s often seen on rural cottages and converted barns, while in the US it’s a staple of farmhouse and craftsman-style architecture. The look can be achieved with natural timber for a warm, organic feel, or with composite boards for reduced maintenance.
For homeowners wanting a fresh twist, batten panels in composite materials are gaining popularity. These mimic the board and batten style but come in ready-made sections, which speeds up installation and ensures a uniform finish. Whether using traditional timber or modern composites, correct batten spacing and weatherproof fixings are essential to prevent moisture issues and keep the cladding looking its best for decades.
Preparing for Cladding Installation
Planning and Measurements
Before you start cutting boards or fixing battens, accurate planning is essential. Measure each wall carefully, accounting for windows, doors, and any features you’ll need to work around. In the US, measurements are often taken in feet and inches, while in the UK you’ll likely work in millimetres and metres — whichever system you use, precision here will prevent costly material waste.
It’s also worth checking local building regulations. In the UK, certain cladding projects may require planning permission, particularly in conservation areas or for buildings over a specific height. In the US, requirements vary by state and county, so it’s best to confirm with your local building department before starting.
Choosing and Installing Battens
Battens are the hidden framework that your cladding boards will attach to. They provide a solid fixing point, create a ventilation gap to prevent moisture build-up, and help keep walls dry. Composite battens are rot-proof and dimensionally stable, making them ideal for wetter climates or where you want a long-term, low-maintenance solution. Traditional timber battens, however, are more affordable and easy to work with if properly treated against rot and insects.
For horizontal cladding, battens are fixed vertically; for vertical cladding, battens run horizontally, often with a counter-batten system to maintain airflow. Spacing is typically 400–600mm apart in the UK and 16–24 inches in the US, but always follow the manufacturer’s recommendations for the specific cladding you’ve chosen.
Tools and Materials Checklist
Before installation day, make sure you’ve got everything on hand. At a minimum, you’ll need:
- Tape measure and spirit level (or laser level for long runs)
- Circular saw or mitre saw
- Drill/driver and weatherproof screws
- Starter clips or fixing brackets for composite cladding
- Safety gear (gloves, safety glasses, ear protection)
Having the right tools from the start ensures a smoother install and reduces the chance of mistakes.
How to Install Cladding (Step-by-Step)
Horizontal Cladding Installation
Horizontal cladding is the most common style and works for everything from modern composite boards to traditional timber planks.
-
- Start at the bottom: Use starter clips or a treated timber base strip to ensure the first row sits level and away from ground moisture.
- Fix battens vertically: Spaced 400–600mm apart (UK) or 16–24 inches (US).
- Attach the first board: Make sure it’s perfectly level — any misalignment here will carry through the whole wall.
- Work upwards: Each board should overlap or click into the one below, depending on the profile.
- Leave expansion gaps: Especially important for composite cladding, which expands slightly in heat. For a detailed visual guide on how to cladding external wall with insulated panels, check these step-by-step instructions.
Vertical Cladding Installation
Vertical cladding gives a sleek, modern look and can make walls appear taller.
- Install battens horizontally to support vertical boards.
- Use counter-battens if extra ventilation is needed — one set vertical, one set horizontal.
- Fix boards from one corner: Work across the wall, checking each for plumb.
- Pay attention to joins: Use cover strips, shiplap overlaps, or tongue-and-groove edges for weatherproofing.
Tip: For vertical composite cladding, follow the manufacturer’s fixing details carefully — the wrong screw placement can cause boards to bow.
Around Openings (Windows & Doors)
Cladding around windows requires precision to keep water out.
- Add flashing tape or metal flashing above openings to divert rainwater.
- Cut boards to fit snugly but leave a 2–3mm gap for expansion.
- Finish with trim boards or edging profiles to cover gaps and give a neat look.
Corners and Edges
Whether using timber or composite, corners should be finished with purpose-made trims. External corners protect edges from damage, while internal corners keep the look clean and stop water getting in. For composite cladding boards, manufacturers often offer matching corner profiles for a seamless finish.
Special Installation Methods & Styles
Mixing Vertical and Horizontal Cladding
Combining vertical and horizontal cladding can break up large wall surfaces and create a modern architectural look. For example, you might run vertical composite cladding on the upper storey and horizontal timber cladding on the ground floor. This not only adds visual interest but can help define different areas of the building.
When mixing directions, plan batten placement carefully. You’ll often need separate batten frameworks for each section to ensure boards are properly supported.
Shiplap Overlaps for Better Drainage
Shiplap cladding, whether timber or composite, uses overlapping edges to direct water away from the wall. It’s especially useful in wetter climates like western UK regions or coastal US states. With composite shiplap cladding, you’ll get the same visual style but with lower upkeep — no repainting or sealing needed.
Board and Batten with a Twist
Board and batten cladding doesn’t always have to be timber. Composite batten panels are now available, offering the same vertical shadow-line effect without the maintenance. These panels are pre-formed, meaning fewer joints and faster installation.
Battens as a Design Feature
While battens are normally hidden behind boards, some modern designs leave them visible as part of the aesthetic. This works best with wider battens spaced evenly, painted or stained to complement the cladding colour. It’s a style gaining popularity in contemporary UK housing developments and high-end US custom builds.
Maintenance and Aftercare
Cleaning Composite Cladding
Composite cladding boards are low-maintenance, but they’re not completely maintenance-free. A light clean twice a year is usually enough to keep them looking sharp. Use a soft brush and warm soapy water to remove dirt, pollen, or algae. For stubborn marks, a mild composite cleaner can be used — but always follow the manufacturer’s guidance to avoid damaging the surface finish.
Caring for Plastic Composite Cladding
Plastic or PVC cladding needs even less upkeep. A quick rinse with a garden hose and a wipe-down with soapy water will usually restore its appearance. Avoid using high-pressure washers on full blast, as this can damage seals or force water into joints.
Timber Cladding Maintenance
Timber cladding requires more attention to maintain its natural beauty. In the UK, annual inspections are key — check for signs of rot, insect activity, or flaking paint. In the US, climates with strong sun may require UV-protective oils or stains to prevent fading. Re-coating intervals will depend on exposure; coastal properties may need treatment every 2–3 years, while sheltered homes can last 5+ years between coats.
Routine Inspections
Regardless of material, inspect cladding once or twice a year for:
- Loose fixings or battens
- Gaps forming between boards
- Damaged trims or corner pieces
- Signs of water ingress around windows and doors
Tackling small issues early can prevent more expensive repairs later.
Hiring Cladding Fitters vs DIY
DIY Installation
If you’re comfortable with basic carpentry, have the right tools, and can follow detailed instructions, fitting cladding yourself can save a significant amount of money. Many composite cladding systems are designed for straightforward installation with click-together boards and pre-drilled fixing points. However, DIY requires careful measuring, patience, and the ability to work safely at height.
Pros:
- Lower labour costs
- Full control over the project pace
- Satisfaction of doing it yourself
Cons:
- Time-intensive, especially for first-timers
- Risk of mistakes that could lead to water ingress or structural issues
- May void product warranties if not installed per manufacturer instructions
Hiring Professional Cladding Fitters
Professional cladding fitters bring experience, speed, and the assurance that work meets local building codes. In the UK, rates typically range from £150–£250 per day per fitter, depending on region and project complexity. In the US, expect labour costs between $50–$80 per hour or a set project fee.
Pros:
- Faster completion
- Expertise in complex details like corners, window surrounds, and irregular surfaces
- Warranties on workmanship
Cons:
- Higher upfront costs
- Scheduling may depend on contractor availability
Tip: Whether in the US or UK, always check references, insurance, and previous work before hiring. A good fitter should also be happy to explain their installation approach and maintenance recommendations.
Troubleshooting & Common Issues
Warping or Expansion in Composite Cladding
Composite boards naturally expand and contract with temperature changes. If you notice warping, it’s often due to insufficient expansion gaps or incorrect fixing placement. For minor cases, loosening and re-fixing boards with the correct spacing can solve the issue. Severe warping may require replacing affected sections.
Water Staining on Vertical Cladding
Water stains can occur when rainwater repeatedly runs down the same section of wall. This is more common in vertical cladding without adequate overhangs or drip edges. Installing a drip trim or improving drainage can help prevent recurrence. Cleaning with a soft brush and mild detergent usually removes the marks.
Loose Boards or Battens
Loose fixings can result from timber battens shrinking over time or screws corroding in damp climates. For timber battens, replacing with treated wood or composite battens can offer a long-term fix. Always use stainless steel or coated screws rated for exterior use.
Gaps or Misaligned Boards
If boards appear uneven, the likely cause is an out-of-plumb wall or poor initial alignment. In some cases, trimming boards and re-fixing trims can disguise the issue; in severe cases, partial reinstallation may be necessary.
Preventing Recurring Problems
- Follow the manufacturer’s installation guide closely.
- Carry out annual inspections to catch issues early.
- Ensure proper ventilation behind cladding to avoid trapped moisture.
Safety & Compliance
Fire Ratings and Material Safety
Not all cladding materials perform the same in a fire. In the UK, building regulations require external wall materials on certain buildings — especially those above 18 metres — to meet strict fire safety standards (Class A1 or A2-s1, d0). In the US, fire rating requirements vary by state, but materials are often tested to ASTM E84 for surface flame spread and smoke development.
For composite cladding, check whether the product includes fire-retardant additives and ensure it meets the relevant local or national standard. Timber cladding can be treated with fire-retardant coatings for added protection, particularly in wildfire-prone US areas or high-density UK housing.
Building Regulations and Permits
In the UK, you may need planning permission for cladding changes on listed buildings, properties in conservation areas, or if you’re altering the appearance of your home significantly. In the US, exterior cladding changes typically require a building permit from your local authority, especially if they affect structural elements or fire resistance.
Compliance Tips for Homeowners
- Always confirm local requirements before buying materials.
- Keep documentation of product certifications for insurance purposes.
- Hire installers familiar with local codes to avoid costly rework.
By addressing safety and compliance early, you’ll avoid delays, potential fines, and future legal issues.
Conclusion
Cladding can completely transform a building’s exterior, offering a blend of visual appeal, weather protection, and insulation benefits. Whether you choose the natural warmth of timber, the low-maintenance convenience of plastic composite, or the modern durability of composite boards, the success of your project will come down to good preparation, correct installation, and ongoing care.
For some, tackling the job as a DIY project offers the satisfaction of hands-on work and potential cost savings. For others, hiring professional cladding fitters ensures speed, precision, and compliance with all local building regulations. Whichever route you choose, investing in quality materials and following best practices will pay off in long-lasting performance and a polished finish.
In the end, cladding isn’t just about covering walls — it’s about protecting your home, increasing its value, and giving it a style you’ll be proud of for years to come.


