Ever wonder why some decks never sag while others shift after a single winter? The secret often hides below the surface in the footings. Sonotubes, those heavy-duty cardboard tubes you see at every hardware store, are the backbone of countless outdoor structures.
They create clean, round concrete piers that support everything from backyard decks to porch columns. Sonotube is actually a brand name owned by Sonoco Products Company. It has become the generic term for spiral-wound cardboard concrete forms used across the construction industry.
This guide covers exactly what you need to know about choosing, sizing, installing, and pouring concrete forms that last for decades.
TLDR: What You Need to Know
Sonotubes are spiral-wound cardboard forms designed for pouring round concrete columns, piers, and footings. They come in diameters from 6 inches to 24 inches at most retailers, sold in 4-foot sections.
Place the tube in a hole dug below the frost line, brace it plumb, pour concrete, and let it cure. For buried footings, leave the cardboard in place. For exposed columns, strip the form within 24 to 48 hours.
A 12-inch diameter tube that is 4 feet tall requires roughly 5 to 6 bags of 80-pound concrete mix.
Quick Facts About Sonotubes
- Manufacturer: Sonoco Products Company, producing these forms for over 75 years
- Material: 100% recycled paperboard, spirally wound and laminated
- Available diameters: 6, 8, 10, 12, 16, 18, and 24 inches at major retailers
- Standard retail length: 4-foot (48-inch) sections at Home Depot and Lowe’s
- Contractor lengths: Available from 4 feet up to 20 feet from specialty suppliers
- Price range: $10 to $30 per 4-foot tube depending on diameter
- Special variants: RainGuard (72-hour moisture resistance) and Finish Free (smooth surface)
Standard Sonotube Sizes and Dimensions
Choosing the right size depends on your project’s load requirements and local building codes. A small fence post needs far less concrete than a deck footing that supports a screened porch.
| Diameter | Concrete per Foot (cu. ft.) | 80 lb Bags per Foot | Common Use |
|---|---|---|---|
| 6″ | 0.20 | 0.33 | Fence posts, mailbox posts |
| 8″ | 0.35 | 0.58 | Light deck footings, pergolas |
| 10″ | 0.55 | 0.91 | Standard deck footings |
| 12″ | 0.80 | 1.31 | Large deck footings, porch piers |
| 16″ | 1.40 | 2.33 | Structural columns, heavy loads |
| 18″ | 1.77 | 2.94 | Commercial applications |
| 24″ | 3.14 | 5.24 | Large structural columns |
The calculation formula is straightforward. Multiply the volume per foot by your total tube height to get the cubic feet needed. Divide by 0.60 for 80-pound bags or 0.45 for 60-pound bags. Always round up and add a 5 to 10 percent waste factor.
As of recent reports, retail prices at major home improvement stores remain competitive. An 8-inch by 4-foot tube runs about $10 to $15, while a 12-inch by 4-foot tube costs $15 to $25.
How to Install and Use Sonotubes
Step 1: Digging the Hole Below the Frost Line
The frost line is the maximum depth where ground freezes each winter. Footings placed above this depth risk frost heave, which can lift and crack your structure over time.
Frost line depths vary widely across the United States. Southern states like Florida and Texas have no frost line at all. Northern states like Minnesota and Wisconsin require footings 42 to 48 inches deep. Check your local building code for the exact requirement in your area.
Dig the hole at least 4 to 6 inches wider than the tube diameter. This gives you room to backfill around the form. Add 2 to 6 inches of compacted gravel at the bottom for drainage.
Step 2: Cutting the Tube to Size
Measure from the gravel base to your desired height above ground. Most deck footings extend 6 to 12 inches above grade. Cut the tube with a handsaw or utility knife. Measure twice and cut once.
For tall piers, splice sections by overlapping them 6 to 12 inches. Secure the overlap with screws or duct tape.
Step 3: Leveling, Bracing, and Backfilling
Set the tube in the hole and center it over the footing location. Use a 4-foot level on multiple sides to check that the tube is perfectly plumb. This step is critical. A leaning tube means a leaning pier.
Brace the tube at both the top and bottom with 2×4 lumber driven into the ground. For tubes taller than 3 feet above grade, add a mid-height brace. Backfill around the base with excavated soil or gravel. Tamp gently in layers. Do not backfill with large rocks because they can break the cardboard.
Step 4: Pouring and Curing the Concrete
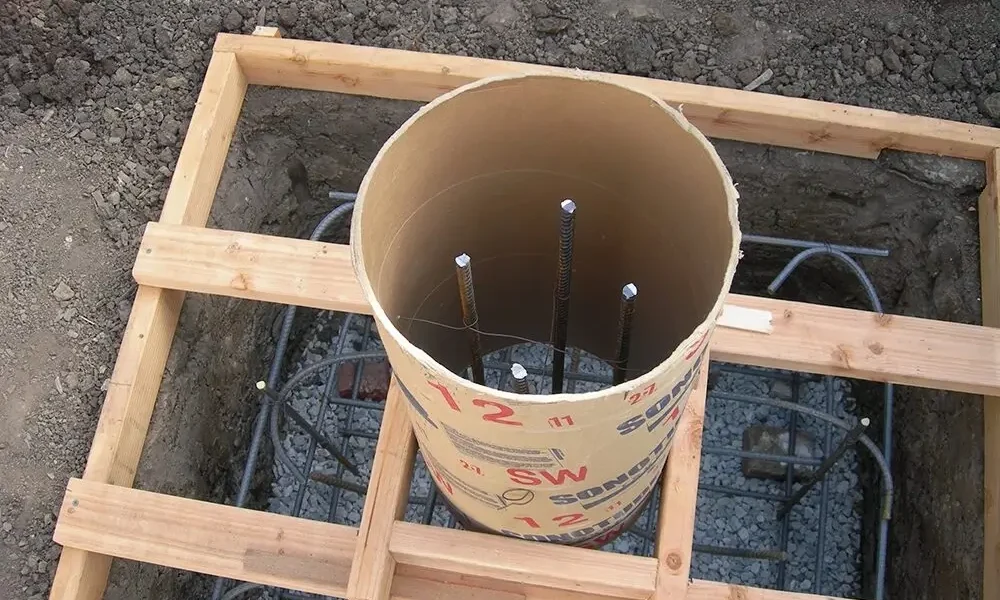
Add rebar before pouring. Place three or four pieces of number 4 rebar (half-inch diameter) inside the tube. Keep the rebar 3 inches from the tube walls using wire chairs. Rebar should extend within 2 to 3 inches of the top.
Pour concrete steadily to avoid air pockets. Tap the sides of the tube with a hammer while pouring. This consolidates the mix and eliminates air bubbles. Fill the tube completely.
Insert post base brackets or J-bolts while the concrete is still wet. Allow the concrete to cure for at least 24 to 48 hours before removing braces. Do not apply significant loads for 7 days. Concrete reaches full strength at 28 days.
Do You Need to Remove the Cardboard Form?
This is one of the most common questions among builders and DIYers. The answer depends on where the tube sits.
For below-grade footings that will be buried, removal is not required. The cardboard naturally breaks down in soil over time. Many contractors leave the form in place to save labor and simplify the process.
For above-grade exposed columns, remove the form within 24 to 48 hours after the pour. Leaving it too long can cause the cardboard to bond with the concrete surface. In termite-prone areas, removal is strongly recommended because the cardboard can create a pathway for pests.
Sonoco offers a Finish Free variant with a built-in StripCord feature. This makes removal simple and leaves an exceptionally smooth surface.
Pro Tips for Working with Concrete Tube Forms
Bracing is the most common failure point in Sonotube projects. Never skip it. Wet concrete exerts significant lateral pressure on tube walls. An unbraced tube will bulge or collapse during the pour.
Keep tubes dry before pouring. Standard Sonotubes can withstand about 24 hours of moisture exposure. If rain is expected, cover the tubes with plastic sheeting. The RainGuard variant resists moisture for up to 72 hours. Never place tubes in standing water.
Pre-wet the tube interior slightly in hot, dry conditions. Dry cardboard absorbs water from fresh concrete too quickly, which weakens the surface layer. A light misting prevents this problem.
Never embed wooden posts directly in concrete. Always use a steel post base bracket set into the wet concrete. This keeps the wood dry and prevents rot at the connection point.
The 2024 International Residential Code includes updated footing provisions that many states are adopting through 2025 and 2026. Always verify current requirements with your local building department before starting any project.
Frequently Asked Questions
How deep should a Sonotube go?
The below-grade portion must extend to or below your local frost line. The above-grade portion should be 6 to 12 inches. In northern climates, total depth often reaches 4 to 5 feet.
Can Sonotubes get wet before pouring concrete?
Standard tubes tolerate roughly 24 hours of moisture. The RainGuard variant extends this to 72 hours. Never use any tube in standing water. If a tube softens from rain, let it dry or replace it before pouring.
Do you remove the Sonotube after pouring concrete?
For buried footings, you can leave the form in place. For exposed columns, remove it within 24 to 48 hours. In termite-prone regions, always remove the cardboard to eliminate pest pathways.
How much concrete does a 12-inch Sonotube need per foot?
One linear foot of a 12-inch diameter tube requires 0.785 cubic feet of concrete. That equals approximately 1.3 bags of 80-pound mix or 1.74 bags of 60-pound mix per foot of height.
What size Sonotube do I need for a deck footing?
Most residential decks use 10-inch or 12-inch diameter tubes. Larger decks or those with heavy roof loads may require 16-inch tubes. Check your local building code and your deck’s load calculation for the exact requirements.