Penny tile may give kitchens, baths, and other areas a distinctive look because of their small, circular shape and elegant charm. However, because of their size and the netted covering that keeps them together, slicing penny tile can be a little difficult. The correct equipment and methods will help you to make accurate and clean cuts, regardless of whether you must remove a few tiles to fit around corners or make a unique design.
Required tools
Get the required equipment before you start cutting penny tiles:
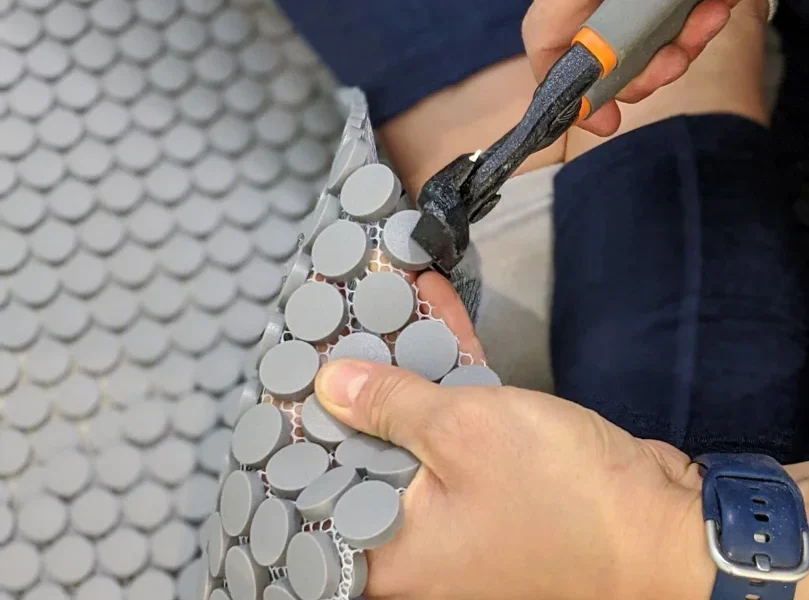
- Tile nippers: Tile nippers are perfect for curved cuts and minor changes.
- Wet saw: For clean, accurate cuts, a wet saw with a diamond blade performs best.
- Tile cutter: Tile sheets can be sliced into smaller pieces with a manual tile cutter.
- Pencil: Cutting lines can be marked with a marker or pencil.
- Safety Gear: To guard against sharp tile pieces, wear gloves and safety eyewear.
Process
The tiles should be measured and marked: The penny tile sheet should first be positioned in the selected installation location. To find out where cuts are required, use a tape for measurement. Using a pencil, indicate the tiles’ cutting edge. Mark each piece individually if you are cutting it.
For straight cuts, use a wet saw: A wet saw with a diamond blade is the ideal choice for precise, clean cuts. Take these actions:
- Turn on the saw after filling the water reservoir.
- Place the tile sheet with the markings in line with the indication.
- Keep your hands away from the blade as you slowly put the sheet through the saw.
- Before putting the removed pieces in place, let them dry.
For small or curved cuts, use tile nippers: Tile nippers are useful for making bending cuts, such as when installing tiles around pipelines or uneven edges.
- Pinch off little portions of the tile using nippers while holding it tightly.
- Apply light pressure to prevent uneven tile shattering.
- Use sandpaper to smoothen any uneven edges.
Cutting Each Penny Tile Separately
According to the sort of cut, utilize tile nippers or a wet saw when you cut separate penny tiles. For exact outcomes:
- Take the necessary tiles off the sheet.
- For straight cuts, use a wet saw. For curves, use nippers.
- Before installation, clean the edges.
Removing the Backing Mesh
Cutting the covering mesh using scissors is a simple way to change the size of a tile sheet. To keep alignment throughout the installation process, make sure the cuts are uniform.
Advice for Improved Outcomes
- Work Slowly: As penny tiles are tiny, excessive pressure might cause them to shatter.
- Use a polishing stone: After cutting, use a polishing stone to smooth off any sharp edges for a better appearance.
- Check alignment: Before installing, test the alignment by positioning the trimmed pieces in the desired location.
- Maintain a Clean Environment: To guarantee good bonding, clear the area of dirt and other contaminants before laying tiles.
More Complex Methods for Cutting Penny Tiles
Although the most common cuts are covered in basic ways, there are other strategies and factors to take into account if you want to deal with penny tiles professionally. These sophisticated approaches will help you develop your skills whether you’re cutting for an elaborate layout, working around equipment, or handling challenging angles.
Cutting Complex Designs
Use a rotating instrument with a cutting wheel if the task requires decorative cuts or complex patterns. When forming tiles to fit unique designs or making complicated cuts, this tool enables accuracy. When a rotary tool is being used:
- To stop the tile from moving, secure it to a sturdy surface.
- Make deeper cuts after lightly cutting the tile.
- To prevent overheating, keep the edge of the blade cool by using water or coolant and cut gently.
Managing Challenging Corners and Angles
A saw with a diamond blade or a wet saw with an angle-control feature can be helpful for locations that need angled cuts, including fitting tiles around corners, edges, or sinks. Actions to take:
- Carefully calculate and note the angle.
- To achieve the desired angle, adjust the saw blade.
- To avoid chipping, cut slowly.
- Before installation, polish the edges using micro sandpaper.
Getting Around Sockets and Accessories
To guarantee a tight fit, precision must be maintained while cutting penny tiles to fit around components like lighting switches, power outlets, and pipes. Apply the following tactics:
- To clarify the cutout shape, make a template out of cardboard or tape.
- Mark the tile piece with the markings.
- For minor changes, use tile nippers. For more extensive cuts, use a wet saw.
- Check alignment before using adhesive.
Comparing Glass and Porcelain Penny Tile Cutting
Various cutting methods may be required, depending on the material of your penny tiles:
- Using specialized tools: For precise cuts on porcelain tiles, use a wet saw. For finer adjustments, use tile nippers.
- Glass tiles: To avoid breaking, use a wet saw with a diamond blade or a glass blade for slicing.
Avoiding Holes and Cracks
As penny tiles are fragile, they may break if they are cut incorrectly. To lessen the possibility of cracks:
- Before putting pressure, carefully slice the tile.
- Make sure to cut steadily and slowly.
- To reduce cracking, cover the cutting line using wrapping tape.
Finalizing and Smoothing Cut Edges
Sharp edges after cutting penny tiles can be dangerous and may not match the finished appearance. For a polished look, smooth the outermost edges using a cleaning stone, diamond file, or sandpaper. To prevent sharp edges from being visible on glass tiles, consider using a rubbing stone. Additionally, when selecting materials for any project, it’s worth considering the long-term benefits of choosing quality roof tiles, as they ensure durability, aesthetic appeal, and overall value over time.
Final Installation and Appropriate Cleaning
Clean the tiles well after cutting to get rid of any remaining debris or dust. Before using adhesive, make sure all of the cut tiles fit properly. You can prevent alignment problems during installation by cleaning and dry fitting properly. You may guarantee that your penny tile job looks precise and professional by becoming experienced in these cutting procedures.